luni, 8 iulie 2019

Inside IQOS

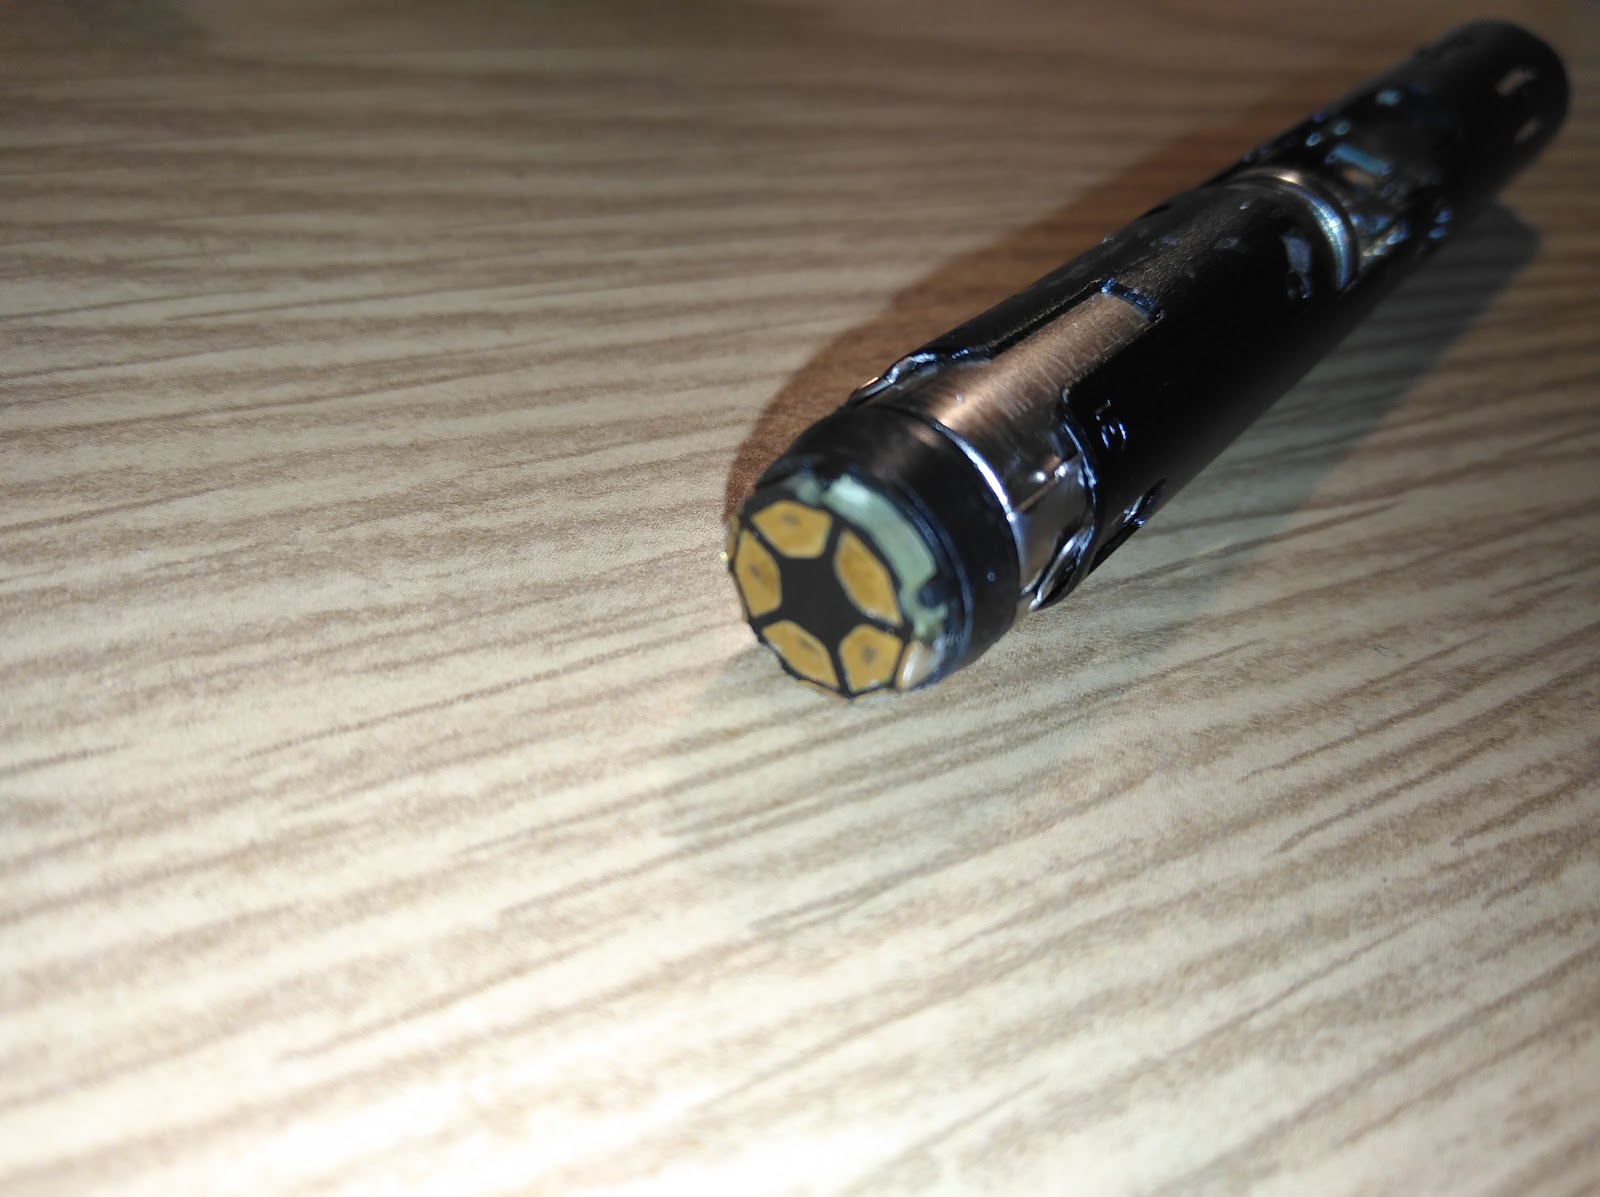
   Ever wondered how the IQOS electronic cigarette looks an the inside?
 

   A few days ago I got my hands on a broken IQOS e-cigarette with a broken heater element so what a better thing to do with it than taking it apart and do some study?
   At first looked to have a simple construction, but quite hard to disassembly. Had to destroy the plastic cover completly to expose the guts of it. But the effort was worth it.

   All thats inside looks like jewlery. Super small SMD resistors, nano transistors like I've never seen before, even the start button is so small that it's a wonder that resist daily use.

   The battery I haven't got the ocasion to test it, but I wonder if it's a lithium accumulator or a supercapacitor?
    And above all, that thing is packed inside a steel tube, quite resistant assembly. 


luni, 26 iunie 2017

7x10 lathe mods to CNC - part 1

   At the begining of this year, I got my hands on a small 7x10 lathe, in relative good condition, with moderate wear. Having allready an Optimum BF20L milling machine, wich is similar to the Grizzly 0704, I was in desperate need of a lathe.
   And here it is :). Judging by brand, is italian made, by aspect is 100% made in China and rebranded, like other 7x lathes.
   First things first I've removed the gear box to make room for the X axis motor.

   The gear box, although made out of plastic gears is quite noisy, imprecise, and gives the sensation of a cheap product, wich in fact it is. The price for a new one is around 700 - 800 US dollars, maybe a bit less if you get a coupen from Aliexpress :P.
    I've found a pice of textolite, that remained from another project, and cutted a nice flange to hold the X axis motor. You can notice the new flange holded in place by an M8 screw. Another support bracket is needed , made out of aluminum, that will keep the flange tight on the main screw bushing.
     And this is the main support for the motor.
     Spacers were made out of calibrated 10mm bar, scavenged from old printers. The motor was also recovered from an old copy machine.
    The end result seems promising. Still waiting for the shaft coupler, wich has 10/12mm holes.

joi, 5 mai 2016

Kitty Cat - PCB CNC machine - part 2

   In the first part of this series, I've presented the materials and a brief description of the Kitty Cat PCB CNC machine.
   I add now a gallery with parts used and differend stages of the construction plus a short video.
 

Linear guides are salvaged from Dell monitor stand

Vertical right-angle support is made out of an old TO3 radiator


Fitting the milling head


Rear view with X and Y motors installed

Rear view with Z motor installed

Kitty Cat and the driving computer on the workbench

First mill - with 0.2mm pcb etching tool


sâmbătă, 13 februarie 2016

Kitty Cat - PCB CNC made out of PC monitor parts


As the title sugests, this PCB milling machine is made out of monitor parts. Yes, it's true :)
You might wonder how is this possible, well let's take a look in the backstage.
First for building a milling machine you'll need a big part called machine bed, ontop of wich you'll mount the moving parts. For the table and the milling head slides are required. This may come in differend shapes and sizes.
For driving the moving parts motors and screws are required.
With this in mind, I've started to look for raw materials.

DELL 2001FP PC LCD DISPLAY as primary donor


The fun part starts right now.


Every LCD Display has behind the display itself a big plate of plexiglass, known as light guide. It's purpose is to disperse the light that comes from the backlight LED's or CCFL's. This part has the same dimensions as the lcd display, and a thickness of around 1cm.
In the case of DELL 2001FP beside the 20" plexiglass plate the stand contains some really nice linear guides with 250mm travel.


After assembly a cross table would look similar to the one above.
Small driving motors are required (NEMA 17), with 0.5A driving current. The motors that I've used were salvaged from old dot matrix printers, Epson's if I remeber well.


And this is an allmost final look of the assembly. (backview)
For control I will use DRV8825 with USB to parallel port adapter and Mach3 driving software.

More info's and videos will come, so stay tuned :)

joi, 29 ianuarie 2015

Fun with Arduino RC control

Well ... it's a fine evening to play with some Arduino coding. I've just finished to put toghether a Zumo shield and a RC receiver ... it looks promising so far.

The test code was taken from Pololu website just to check if everything works, but I intend to recode the little robot with some heavy complex code similar to MultiWiiCopter one.

Untill then ... wish you happy coding :).


THE TEST CODE

#include <ZumoMotors.h>

#define THROTTLE_PIN 4 // throttle channel from RC receiver
#define STEERING_PIN 5 // steering channel from RC receiver
#define LED_PIN 13 // user LED pin

#define MAX_SPEED 400 // max motor speed
#define PULSE_WIDTH_DEADBAND 25 // pulse width difference from 1500 us (microseconds) to ignore (to compensate for control centering offset)
#define PULSE_WIDTH_RANGE 350 // pulse width difference from 1500 us to be treated as full scale input (for example, a value of 350 means
// any pulse width <= 1150 us or >= 1850 us is considered full scale)


void setup()
{
pinMode(LED_PIN, OUTPUT);

// uncomment one or both of the following lines if your motors' directions need to be flipped
//motors.flipLeftMotor(true);
//motors.flipRightMotor(true);
}

void loop()
{
int throttle = pulseIn(THROTTLE_PIN, HIGH);
int steering = pulseIn(STEERING_PIN, HIGH);

int left_speed, right_speed;

if (throttle > 0 && steering > 0)
{
// both RC signals are good; turn on LED
digitalWrite(LED_PIN, HIGH);

// RC signals encode information in pulse width centered on 1500 us (microseconds); subtract 1500 to get a value centered on 0
throttle -= 1500;
steering -= 1500;

// apply deadband
if (abs(throttle) <= PULSE_WIDTH_DEADBAND)
throttle = 0;
if (abs(steering) <= PULSE_WIDTH_DEADBAND)
steering = 0;

// mix throttle and steering inputs to obtain left & right motor speeds
left_speed = ((long)throttle * MAX_SPEED / PULSE_WIDTH_RANGE) - ((long)steering * MAX_SPEED / PULSE_WIDTH_RANGE);
right_speed = ((long)throttle * MAX_SPEED / PULSE_WIDTH_RANGE) + ((long)steering * MAX_SPEED / PULSE_WIDTH_RANGE);

// cap speeds to max
left_speed = min(max(left_speed, -MAX_SPEED), MAX_SPEED);
right_speed = min(max(right_speed, -MAX_SPEED), MAX_SPEED);
}
else
{
// at least one RC signal is not good; turn off LED and stop motors
digitalWrite(LED_PIN, LOW);

left_speed = 0;
right_speed = 0;
}

ZumoMotors::setSpeeds(left_speed, right_speed);
}


miercuri, 28 mai 2014

Romanian stratospheric baloon flight

Yesterday 27.05.2014 at Targu Mures, Romania, we launched a stratospheric baloon for scientific experiments. This is the first launch in a series that we hope to be very long and fruitful.
The launch was made from a fiel near by Targu Mures, more precisely from Hodosa - Damieni field.
In a few words, the baloon was a simple 2m diameter latex one, filled with hellium, and the packege contained an APRS radio with simple telemetry, a GPS, an internal thermometer and one cosmic radiation detector wich will be analised in Switzerland in the following weeks.
At 10:40 AM the baloon was left to go, and climbed over 21.000m were it exploded. The package was recovered around 15:00 PM near Teaca village.
The APRS radio had the YO6KBM-11 indicator and the flight path can be seen here.

The launch was initiated by Universitatea Cultural Stiintifica.

Also a short film with the most important moments can be seen on Youtube.

miercuri, 8 ianuarie 2014

Free energy ? Is it possible ?

   Surfing on the web, I came across some informations, published by a serbian academician called Veljko Milkovic.
   His invention is a two stage mechanical oscillator, which he claims to produce more power that is required to keep it functioning. Perpetuum mobile ... overunit device ? hart to tell.
   The inventor released a series of films on youtube, that must clarify that his devices really produce more that they consume.


   For those interested here is the inventors website.